Sunday, February 28, 2016

Extreme Macro with the Canon 65mm 1-5x Lens

Extreme Macro with the Canon 65mm 1-5x Lens

Most high-end macro lenses can focus from "infinity" to about 1x magnification (where the image is projected on the sensor at "life size").

The Canon 65mm f/2.8 1-5x  is a very special macro lens that starts at 1x and continues all the way to 5x, allowing for some extreme closeups!

I rented this lens for a week to give it a test drive.  In this "impressions" review, I talk about my experiences with the Canon 65mm and provide a number of sample images I captured with the lens.  My goal is to give you a clear idea of what it's like to use this lens and what is possible with it!

Overview

These two images show the lens at both magnification limits: 1x all the way to 5x!


The build quality of this lens is very impressive.  The lens appears to be a nearly 100% mix of metal and glass.  The lens body has a good "weight" to it.  Tolerances are extremely fine. There is just enough dampening on the focus knob and no wobble or loose parts to speak of.

A tripod collar is included on the lens.  I don't think it's included because the lens is heavy but instead to make composition tweaking a bit more balanced.  The collar also allows for a convenient change to portrait framing.

The street price of the lens as I write this is around $1000.

There is no auto focus on this lens.  One might argue there is no focus at all.  More on that later...

Sample Images

Here are a few images I captured with this lens, just to get an idea of what it can do in the hands of someone who is experienced with macro photography but not extreme macro:

Blueberry at about 2.5x

Moss, at about 3x. Note the cell walls!

More moss, at about 4x
Tiny Flower, at about 2x

Possibilities

The magnification possible with this lens is impressive.  The lens will reveal features and details that you will never see with a normal macro lens.  For example:


In this tight crop, note that we can actually see cell walls on this tiny piece of moss.  Also note the single cell white "sphere" on the moss.  I'm not sure what it is, but it looks like an egg to me.

To show a more intuitive view of the magnification possibilities, I photographed a LEGO brick at magnifications between 1x and 5x.  Note that the 1x setting is the farthest focus possible with this lens - it can not focus from further away.

1x (the minimum)


2x


3x


4x


5x (the maximum)


Limitations

As a specialized lens, the Canon 65mm has many limitations.  Here I try to list the major ones:

Focus is Basically Fixed

With a normal lens, you can focus using a focus ring.  While you can sort of do this with the Canon 65mm, it's not too practical for the following two reasons.
  • The in-focus range is so small, that it's hard to know how to position the camera
  • The magnification changes fairly dramatically as you "focus", thus composition changes as well
For these reasons, it's good to have a macro rail on hand.  You can then use the macro rail to focus and work around some of the challenges.


Here is focus distance by magnification that I grabbed from the manual:


No Infinity Focus

The above point implies that you can't use this lens to photograph anything larger than a penny.  This means no portraits, no landscapes, etc.

Light and Diffraction Issues

The lens specification sheet claims it's f/2.8 but, due to the extreme magnification, the "effective" aperture is smaller (this is thanks to physics, there's nothing the lens can do about it).  The more you magnify, the smaller the effective aperture will be.  The reduced aperture causes light loss, which affects metering.   The reduced aperture also causes diffraction-based softening.  This chart (from the manual), gives the light loss in stops:


As an example, if you are shooting f/8 and 3x magnification, you will really be at f/8 + 4 stops, or f/32.  On a modern camera, diffraction softening at f/32 is quite noticeable when "pixel peeping".

The light losses mean that you will need powerful lighting to illuminate your subject.

You can try capturing images without flash, but this will likely mean several second exposures.  Note that even the slightest movement at these magnifications will cause blurring.  I tried 0.5 second exposures and saw small shifts that blurred the image slightly.  I saw the best results using flash in a setup like this:


In the setup above I am using a LED light for framing, then a flash for actual exposure.

Tiny Depth of Field

If shooting at f/8 and really getting f/32 wasn't challenging enough, you also end up with tiny depth of field.  Here is the breakdown from the manual:

As the chart shows, you get about 1 mm at f/8 and 1x magnification.  If you go 5x, you only get 0.13mm (!).  To me, this means that focus stacking is almost mandatory for satisfying results.

I ended up using Helicon focus for my stacking.  You can also try the free Combine ZP, although I think that Helicon is worth paying for (especially if you get a $1000 specialized lens like this one).

As an example, here is that blueberry photo again - the stacked version verses a single frame:

A single frame from the lens, showing the natural depth of field


A stack of many frames in Helicon Focus
Of course, stacking is easiest if the object does not move.  If you want to capture something that might move, prepare to get creative with tiny depth of field or more advanced alignment techniques.

Final Thoughts

Like most things, this lens has it's trade-off.  It can capture images that other lenses simply can not provide.  But, in doing so, it brings a long list of limitations that other lenses do not have.

I personally tend to forgive the limitations in light of the fact that the images you can produce are so different than people normally see.  I think that in today's environment, where images are flooded on the internet every day, anything one can do to create distinctive work can make a difference.  For those who's creative energies resonate with the macro world, it's a great option to explore further.

If you are just getting into macro, I recommend starting with a 1:1 macro lens that can focus to infinity.  It's simply more versatile.  Even if you own the Canon 65 mm, you'll also want a general-purpose macro to compliment it..

I personally do not own a Canon body that can mount this lens (which I rented).  Thus, it would be quite an investment for me to acquire one permanently.  In light of this situation, I'm going to wait and possibly write down ideas for compositions - it would be interesting to see how many I can come up with as fuel for "justification".

In summary, if you can mount this lens and are into macro photography, I definitely recommend renting it for a week or so, you'll have fun :)

.


Sunday, February 21, 2016

Exposure - In Depth

Exposure - In Depth

Exposure is one of those overloaded terms in photography that has an several explanations which are not really usable in an interchangeable way - they are actually talking about different things.  This situation leads to endless arguments over semantics as well as people having a hard time grasping more advanced concepts due to picking "the wrong model".

What is the right model?  I prefer the "official" one, derived from scientific units.  The official model makes it possible to understand many concepts (explained later), such as ETTR, "isoless", dynamic range, etc as concise concepts within the exposure family.

This article covers the official definition of exposure and also the alternate "exposure triangle" form that seems to be taught to beginners.  This article explains the differences and highlights situations where the exposure triangle model breaks down.  Finally, this article briefly covers a number of topics, such as Dynamic Range, HDR, ETTR, and explains how these relate to exposure.

This article is probably too much information for beginners to absorb in one sitting.  If you are a beginner, I recommend reading this article one section per day and mixing in other articles and lots of experimentation.  Have fun!

Official Definition

The official units for exposure are lux-seconds.   Let's build it up a piece at a time:

 A lumen is based on how our eyes perceive light energy - think "brightness".

A lux is defined as "one lumen per square meter".  With lux, we can talk about how much light is striking an area.

Exposure takes lux and adds a time component.  Now we can talk about "how much light is striking an area over a time period":

exposure = lux * seconds
         = lumens * second
           ---------------
            meter * meter

I do not expect math to be everyone's forte, but the above is basically saying that the following matters in exposure:
  • Light Intensity - measured in lumens
  • Time - measured in seconds
  • Area - measured in square meters
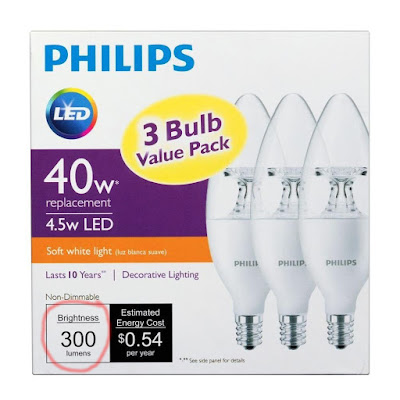
Modern energy-efficient light bulbs report their brightness directly in lumens

Understanding The Ratio

As a ratio, the square meters area component can be cut up in different ways.  An analogy is your drive into work, which can be measured as miles/hour or kilometers/hour.  You can use different things for the "per hour" part:
  • You can think of the whole trip, giving an average speed
  • You can think of the minimum or maximum speed during the trip
  • You can draw a graph that tells how fast you were going for each second
  • You can create a histogram that counts how many seconds you were at each speed
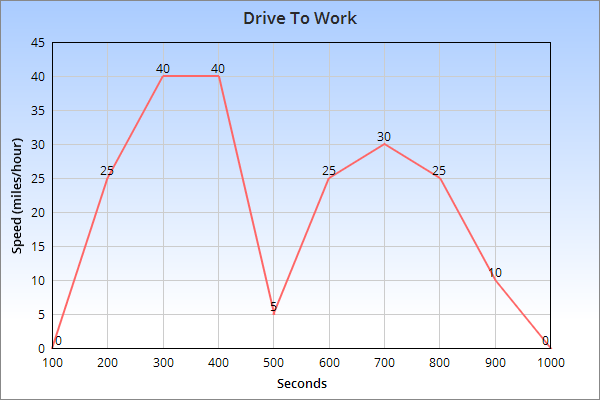
The "per hour" part of a drive to work can be thought about in many ways.  For example maximum speed (40 mph), minimum (0 mph), average (20 mph), and much more.

With exposure, it's the same concept, with image area being the denominator variable:
  • There is average exposure across the entire image
  • There is a minimum and maximum exposure within the image (in digital, it would be the most exposed vs least exposed pixel)
  • There is exposure at every pixel, which is the raw image itself.
  • There is a histogram which gives populations of pixels at each exposure level
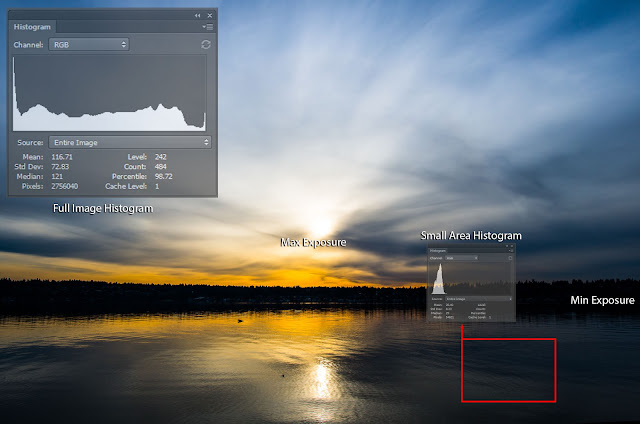
Just like the drive to work, the "image area" denominator of  exposure can be looked at in many ways.  You can look at the maximum, minimum, average, or a small area.  Also note, that the above image does not tell us what the actual exposure was at capture time.  More on that later...

What is the Purpose of Exposure?

Exposure, as it varies across an image, literally provides the light-based information available to build an image from.

Exposure serves a second purpose in that digital sensors and film need some of it and can't take too much of it.
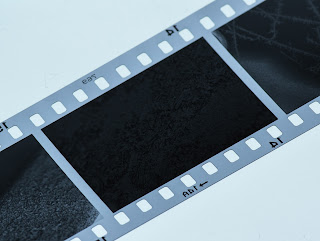
In film

Light exposure causes a silver reaction, forming a silver salt.  For example silver bromide to silver halide (not the only possibility).

Not enough exposure means the silver crystals fail to reach activation energy.  When the negative is subsequently developed, all of these crystals wash away from the film, leaving only the plastic base.  In these cases, there is no detail to recover.

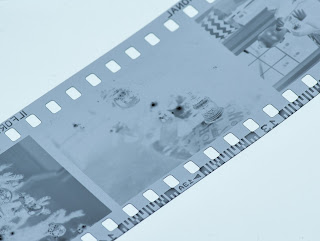
An example of an underexposed film image.  Most of the silver crystals have literally washed away during development - no detail will be recoverable here.


Too much exposure means that most of the silver crystals have reacted, yet there are always a few here and there that can still activate.  This leads to a gradual highlight roll-off.  In development, these highly exposed areas will be very dark and dense on the film which can make scanning and printing details in these area more challenging (but, unlike washed away low-exposure crystals, it can still be done).

An example of an overexposed film image of ice crystals.  Details are very dark but are still present.  With enough exposure under an enlarger or scanner, an image with reasonable (not optimal) detail can still be recovered.

In Digital

Not enough exposure in digital is less well defined.  Basically digital very efficiently captures even tiny amounts of light but there is a "noise floor" that can hide this light, making it invisible.

Interestingly enough, even when the light level is very low, it's possible to take many near-identical noisy images and "average them" to cancel-out the noise.  This advanced technique is used in astrophotography and other applications that have to work with very low light.

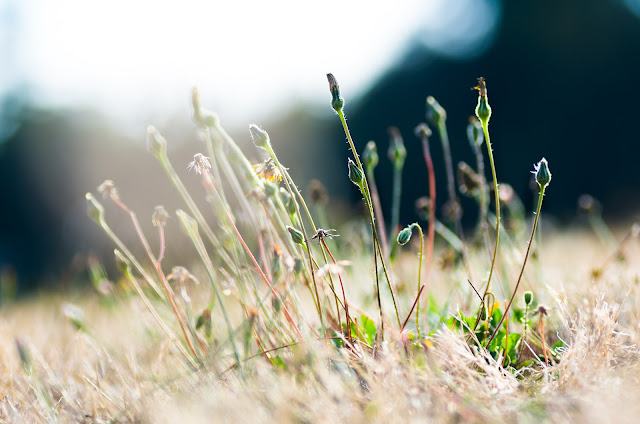
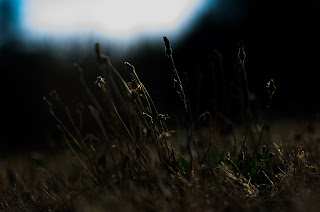
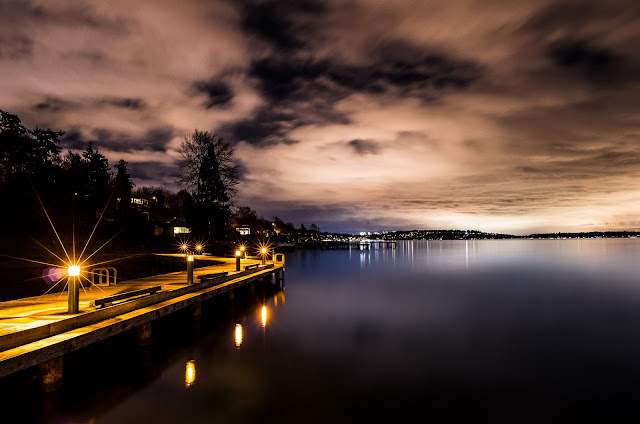
This image has underexposed trees on the left side.

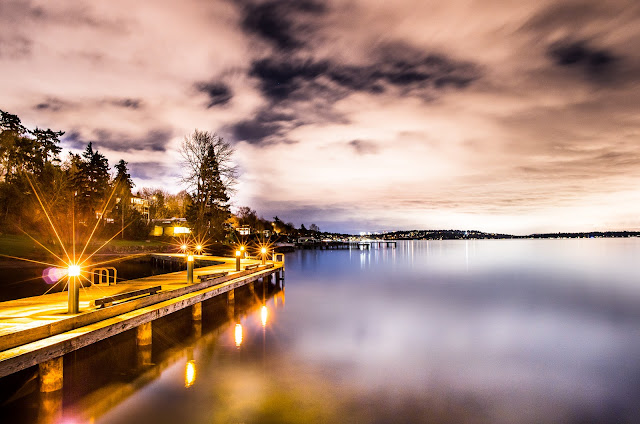
Here I did some extreme brightening to  to show what "underexposure" in digital means.  The trees were raised in exposure by 6 stops!  (I explain stops later in this article)
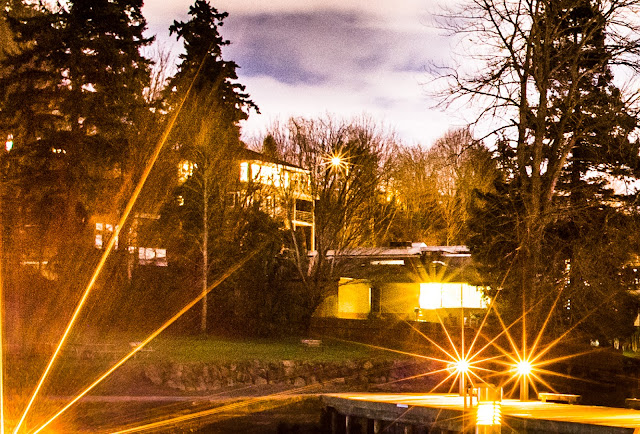
A closeup of the severely brightened area, showing there is still detail there, but also noise.

Too much exposure in digital causes the digital "bean counter" pixel bins to saturate.  Say a given digital sensor's pixel can tell you a brightness value from 0-1000.  Once it hits 1000, it's will keep saying 1000, no matter how much additional light hits it.  This means that highlights in digital exposed to this level are simply not possible to recover.
To say a bit more, we can know that the number was more than 1000 but can't tell if it's 1,001 or 10,000 or any other number over 1000.

Many camera manufacturers tweak their exposure algorithms to create a "safety gap" from over exposure.  The result is that most images have a bit more noise than necessary, but fully-blown highlights are less common.  Of course, you can always override the camera's suggestion (for example, by shooting in RAW and using manual exposure mode)


The upper-left of this image has been purposefully overexposed by shooting in manual mode.  No amount of "debrightening" can recover the details

Here is what happens when we try anyway...

By The Way: Exposure is not Image Brightness

This is an area where countless people seem to be confused.  Let's start with an example:


Which images above are overexposed and which are underexposed?

The correct answer is that you can't tell what the exposure was.  The images above are all the same image, but were brightened to different levels.  I could just as easily make an image with more exposure appear less bright than one with less.  Thinking back to the original units:
  • Light (lumens)
  • Time
  • Area
There is no place for post-brightness changes in the definition of exposure.  Exposure is what happens when the camera captures the image, not what software in your computer or camera does later in post processing.

In film, the same brightness argument holds.  You can affect negative densities with development time and technique and you can further affect print brightness with enlarger exposure time choices and paper choices.

Why does this matter?  Because understanding concepts like dynamic range, preserving highlights, ETTR, etc are all simplified when you remove image brightness from the conversation - image brightness has zero influence in the capture process of all of these and simply serves to confuse and complicate the concepts.

Exposure Values do not Consider ISO

ISO is a simple way to think about how a given exposure relates to image brightness.  This seems like a contradiction to the last section.  This contradiction is resolved below...

In Film


ISO determines how much exposure is needed to get the film to a given density when using recommended development technique.

Varying the development technique (especially time) will cause the density to vary as well, with shorter times leading to less density (and lower contrast) and longer times leading to more density (and higher contrast).  This is also known as "pushing" and "pulling" and can be used both to compensate for exposure variances and as an (advanced) way to control the overall dynamic range preserved.  Thus ISO is only a "following all rules" measurement.

Also, as explained in the previous section, film density is just a starting point for printing - it's more accurate to say that film contains image detail than image brightness.

In Digital


Digital has multiple definitions for ISO.  The one that is most-accepted is the exposure needed to achieve 18% "middle grey" in the final JPEG result.  This definition makes ISO related only to final image brightness at a given exposure.

Remember from above that brightness can be changed independently of what was captured.  Indeed, just about every company maps their raw sensor values to JPEGs a little differently - trading off general image noise for highlight protection.

If you have your camera set to produce JPEG images (which is the only choice for some), then you are mostly stuck with the brightness mapping options the camera offers you, although some light post processing seems to be ok.

If your camera can produce RAW files, you can map exposure to final brightness in a more fundamental way, giving more flexibility.

Complex?  Ok, increasing ISO in digital can be thought of a basic way of post-brightening a given exposure.  Using ISO to brighten an image reveals more image noise.  Actually providing more light avoids the noise.

The Beginner's "Exposure Triangle"

Many sites explain exposure using the "exposure triangle", like this:


The idea is that you can get more of one factor by giving up one of the others.  This is true and useful but "exposure triangle" is a misleading name...

This triangle contains ISO... but as explained above, changing ISO does not change exposure.  Because ISO can not change exposure, It's quite easy to break this triangle in many real world situations:
  • If the camera is in a pitch black room, no amount of changing ISO, aperture, or shutter speed is going to affect the fully-black image
  • If a camera takes two pictures with identical aperture/shutter/iso settings, but one has flash activated, the image will have very different exposure, yet the triangle does not reveal this.  Is flash a special case?  Does it need to be?
  • The same can be said when adding a neutral density (or any) filter.
  • What about changing weather conditions, or if a cloud goes over the sun?  All camera setting were the same -- yet exposure, as defined in lux * seconds, changed.
Basically the exposure triangle falls short in describing the options you have for controlling light (flash, filters, etc).  It also mixes exposure and brightness together in a way that falls short of what's actually possible.

One might argue that the "exposure triangle" is not meant to be exposure, and despite it's shortcomings is a useful model for beginners.  This is a reasonable argument, but it's still unfortunate that so many cases and situations in every day photography fall into the exception path of the exposure triangle model.

I initially learned with this triangle and feel that it tended to hold me back in I was thinking about photography situations in terms of ISO, shutter speed and aperture - In many of these cases, thinking about lighting and flash options would have led to better images.  YMMV.

The "Real" Exposure Triangle

The real exposure triangle derives directly from the units of exposure.  It is:


In this model, it's all about exposure and how to get more or less of it.

Basically, you can make a change in the triangle that lessens exposure and either accept more post-capture image brightening (and noise), or you can compensate the exposure change somewhere else in the triangle.  That's it!

Unlike the exposure triangle, it's not covering "side effects" directly (such as more or less depth of field) but leaving those to be explored on their own terms.  All post-exposure image brightening (including ISO) are left out of the model.

In this model:

Light sources provide light, examples include:
  • The sun
  • Use of flash
  • Light bulbs
Light filters throw away light that could used (hopefully in trade for some desired outcome), examples include
  • Aperture Setting with smaller apertures allowing in less light (more noise) in trade for more depth-of-field.
  • Neutral Density Filters:  These filters absorb some of the light.  Why do that?  The primary practical reason is to purposely force a slower shutter speed.
  • Polarizing Filters: These filter out non-polarized light, which is a separate subject but essentially reduces some types of glare.  Anyway, the non-polarized light that's filtered away can no longer be used for exposure.
  • Color Filters: Color filters work by blocking some of the light from other colors.  Less light means less exposure.
  • Clouds
  • Shade from trees, buildings, etc
Shutter speed  is simply how long the light is allowed to collect.

Shutter speed is the most assuming factor in the triangle. It's assuming light sources are uniform throughout the exposure.  Flash, which is only active for 1/10,000 of a second, does not adhere to this assumption.  As a result, light bursts added by flash can not be influenced by shutter speed.  You might image other cases (flashing lights, traffic at night), but I feel they are too off-topic for coverage here.

Model Summary

The above definition defines exposure in a way that is consistent with units, covers many more of the "exceptions" that the previous triangle can not, and prepares us for deeper understanding.

What's a "Stop"?

A stop is a exposure difference that represents exposure being doubled or halved.  Increasing exposure by one stop means doubling it.  Decreasing exposure by one stop means halving it.

The purpose of a stop is to allow us to think about exposure calculations (in either triangle above) in a way that allows for simple addition and subtraction.  Thinking about exposure in something other than stops requires harder math, and who wants to do hard math during a photo shoot?

In terms of shutter speed, stops are easy to think about, 1/8 second is 1 stop darker than 1/4 second and that's 1 stop darker than 1/2 second.

This also means that 1/8 second is 2 stops darker than 1/2 second.

In terms of aperture, stop calculations would be easy if we were talking about the area of the aperture hole, but aperture is defined in terms of the hole diameter instead.  You might remember in math that circle area is related to diameter as area = pi * radius * radius  or equivalently:  pi * diameter * diameter / 4.  You can thus decrease light by one stop by converting diameter to area, halving the area, then converting back to a diameter.  Let's do it for "fun".  If reading the math below sounds boring, just skip to the bold conclusion and be happy:

At 50mm, f/2 = 50/2 = 25 mm diameter

area = pi * diameter * diameter / 4
     = 3.14159 * 25 * 25 / 4
     = 490.87 mm*mm

1 stop slower => new_area => area / 2 = 245.44 mm*mm

new_diameter * new_diameter = new_area * 4 / pi

new_diameter = sqrt(new_area * 4 / pi)
             = sqrt(245.44 * 4 / 3.14159)
             = 17.68 mm

new_fstop = 50 mm / 17.68 mm = f/2.83 ~ f/2.8

Thus f/2.8 is one stop darker than f/2

You might notice that the math above can be simplified.  Indeed for any focal length, f/2.8 is one stop darker than f/2.

Clearly, most people don't break out the math when calculating aperture, instead they just memorize or look up the stops where each is "one stop slower" than the last:

  • f/1
  • f/1.4
  • f/2
  • f/2.8
  • f/4
  • f/5.6
  • f/8
  • f/11
  • f/16
  • f/22
  • f/32
  • ... and so on


Using Stops In The Field

Thinking about exposure in stops is convenient because you simply add them and subtract them to make various trade-offs and it's "simple" math to do in your head, once you get enough practice...

 For example, if you are happy with an exposure at 1/100 sec, f/8, you have all sorts of options for making changes while keeping the exposure the same:
  • Add a stop of aperture (f/5.6) remove a stop of shutter speed (1/200)
  • Remove two stops of aperture (f/16) add two stops of shutter speed (1/25)
  • If using flash, remove a stop of aperture (f/11) and double the flash power (which adds one stop of light).  Note that shutter speed can not make a change to the exposure contribution of the flash because the flash happens so fast that it makes the shutter speed irrelevant.  This is a topic for another article.
  • Add a 3 stop neutral density filter, open up the aperture one stop (f/5.6) and cover the other two stops with a longer shutter speed (1/25)
  • We could go on and on forever.
Note, you can also reduce the shutter speed by 1 stop (1/200) and increase ISO by one stop (say ISO 100 to ISO 200) to get the same resulting JPEG image brightness.  This is not the same exposure though, and the resulting image will have more noise as it applied more brightening to less available light.

Stops Don't End With Aperture and Shutter Speed

As heavily implied by the "real exposure triangle" above, everything that affects light has something to say about stops.  This includes:
  • Flash : You can double and half flash "power" to add/remove stops.  You can also use the inverse-square law to do so (too much depth to cover here, but basically moving the flash closer and farther away).
  • Any light source
  • Filters of all types, which will tell you their estimated light loss (in stops) in their specification.

A Quick Overview Of Concepts Related To Exposure

Now that exposure is (hopefully) understood, terms can be described more clearly.

Dynamic Range


Dynamic range is an overloaded term.  It can refer to (at least) these two things.

  • Scene dynamic range: The difference between maximum and minimum exposure value in a frame as measured in tiny areas.  It's measured in stops using a spot meter.
  • Camera dynamic range: How many stops are between a pixel's high-saturation point and the point where the signal-to-noise gets too excessive to call the pixel "clean".  This number is muddled by the fact that my clean pixel might not be your clean pixel.  It's further muddled by the fact that averaging pixels together reduces noise, thus downsizing an image can increase measured dynamic range.
Dynamic range is measured in stops.

High Dynamic Range (HDR)


The semantics police were definitely on vacation the day that HDR was born.  Officially, High Dynamic Range means successfully capturing an image that contains a good deal of dynamic range between the highlight and shadow areas.  This was somehow convoluted to include:

  • Bracketing (taking multiple images at different exposures and combining them).  Bracketing certainly improves dynamic range but many of the latest cameras have a high dynamic range without needing to employ this practice - they can get it in one capture.
  • Tone Mapping.  In the context of HDR, tone mapping means mapping a high dynamic range image to a lower dynamic range output device.  For example, say you have an image with 14 stops of dynamic range.  That's great but your monitor can only display 9 and your print/lighting combination can only show 6.  Deciding how to resolve this is known as "tone mapping."  Tone Mapping involves squeezing some high and low pixels into the target space and mapping others to pure black or white.  It's an art and sometimes the results are convincing, other times very "artsy" :)  Note that tone mapping is (nearly) always used for non HDR images too, analog film included.  Without some tone mapping, images tend to look "flat" and unappealing.
It's common for people who don't understand HDR deeply to bracket and heavily tone map low dynamic range scenes that the camera could easily handle in one shot with no mapping.  Such is the result of the convoluted definition...

Isoless

An ISOless camera sensor is a sensor where it's very difficult to measure the noise difference between an image taken at a high ISO and that same image (with the same exposure) taken at a lower ISO, then brightened later in post-processing. 

When a camera is ISOless, it can pay dividends to actually shoot at a low ISO, then raise it later.  The reason is that the low ISO photo will contain additional dynamic range that the high-ISO capture discarded.


Both of these images were taken with the same exposure (1/25 @ f/2.8).  One image was taken at ISO 1600.  One was taken at ISO 100 then brightened 4 stops in Lightroom.  Can you see any differences?

ETTR (Exposure to the Right)

Noise is a part of every image, film or digital.  The more exposure you are able to give, the more this noise is defeated by actual image signal.  ETTR is the digital-only practice of giving your sensor as much exposure as you can, but no more.  Too much exposure, and pixels start getting saturated, losing their ability to tell us anything.  Just a tiny bit less than too much, and noise is minimized across the image.

Note that ETTR is not over or under exposure, it's an optimized exposure that optimizes for low noise (and optimizing for noise is not always what you want, such as when shooting action).  As we covered above, the brightness that you get is not an exposure-related concept.

ETTR assumes that you will be adjusting the brightness to your taste later.  There is also a bit of an art in ETTR in allowing some pixels to saturate because you don't care about losing the detail and would rather get more shadow detail captured.  A prime example is the sun.  If the sun is fully white in post, we can work with that, especially if some of the darker areas give more detail in trade.

There is much to cover on ETTR and I'll likely cover more in a future article.

Sensor Size "Equivalence"

This is a never-ending argument with one side saying:

  1/100 second with f/2.8 in micro forth thirds is equivalent exposure to 1/100 second with f/5.6 in "full frame" 35mm

and the other says

  no, f/2.8 = f/2.8 on any format

Who is right?

Well, they are both right because they are talking about two different things.

The f/2.8 = f/2.8 argument is talking about photographic exposure in terms of

lumens * seconds
---------------------
meters * meters

And, yes, sensor size is irrelevant here, it's factored out by the denominator.

But the equivalent statement is multiplying by an area.  Thus it is talking in terms of these units:

lumens * seconds

and since the area of a full frame sensor is 4 times larger than micro four thirds, you do indeed need two additional stops of exposure to get the "lumens * seconds" values to be equal on both sides. 

Maybe calling it an "equivalent exposure" is where the trouble lies as the semantics of "exposure" are loosened.  If we had a popular term for "lumens * seconds" measurements, then some of the semantic quibbling might be reduced...

So both sides are right but the practical implications are different:
  • The "f/2.8 = f/2.8" correctness is interesting when trying to meter a scene. 
  • The "f/2.8 u43 = f/5.6 ff" correctness is interesting when thinking about how many lumen * seconds are contained in an image (which itself correlates strongly to image noise).

Limitations and Further Considerations

This article does not expand on the color aspects of exposures that vary by color, which is an interesting more advanced topic.  As a simple example, it's possible to overexpose only a single color channel (say red), while the other channels (green, blue) are not even close.  In this situation, an advanced photographer might choose to use a color filter (aqua) to get additional exposure, fixing the color balance later.

Photographic Exposure is measured in lux * seconds.  Remember that, since lux is derived from human vision, it does not directly represent how digital sensors or film chemistry function.  Instead photographic exposure is a model of what light-based information these technologies are trying to successfully capture.  Understanding how cameras actually record light requires further research into the subject.


Saturday, February 13, 2016

Choosing A Lens - Beyond Just Sharpness

Choosing A Lens - More Than Sharpness


When many people talk about lenses, the conversation seems to gravitate toward sharpness and stay there.  Although sharpness is important, it's not the only consideration by far.  If you want better results from your camera and lenses, you need to think about lenses in greater terms than just their sharpness. 

This page describes many different aspects of a lens you might consider.  Throughout the article, I also try and describe when and why a particular aspect might matter.

How To Test

The best way I have found is to rent a lens you are thinking of buying for a week and use it as you would in "the real world".  It's also good to review the qualities listed below and explore the ones you think you might run into in your type of shooting.  I find Lens Rentals to be a reliable place to rent from.  Another approach is to borrow a lens from a friend or coworker.  E-bay and craigslist are also nice options if you are comfortable buying and selling.

Lens Qualities

I cover a lot of material in this article.  I thought about breaking it up but decided there is value in being comprehensive.   To support a a quick read, I try to summarize the key points of each section in the first paragraph.

Specification Aspects

Specification aspects are aspects you can find in a lenses specification sheet and are often present in the title of the lens.

Maximum Aperture

This is a set quality of a lens which specifies how large the aperture can be.

Credit: Wikipedia


Aperture is usually measured in f-stop, which is a ratio of focal length and aperture diameter.  For example, a 50 mm lens with an aperture opening of 25 mm is set to 50/25 = f/2.  Terminology can be confusing for beginners; here are the basics:

  • "Large Aperture" = "Fast Lens" = small f-stop number
  • "Small Aperture" = "Slow Lens" = larger f-stop number
  • "Stopping Down" means making the aperture smaller (increasing f number)
  • "Wide Open" means the lens is set at it's largest aperture (smallest available f number)

 Subjectively, a "fast" lens would offer a max aperture of f/2.8 or faster while a "slow" lens would be f/4 or slower.


A larger max aperture allows for less depth of field and, as a directly related effect, faster shutter speeds for the same lighting conditions.  A large maximum aperture can make the difference between getting enough shutter speed in lower light and not making it.

Larger max apertures also allow for more precise focusing (unless there is focus shift, which is described later).

For landscape and macro application, max aperture is less important.  It can even be a downside as the lenses will be bigger and thus harder to carry.  The larger aperture might also bring along a need for larger filter sizes and increased flare issues.

Nearly all "fast" lenses have more aberrations (described later in this article) "wide open" than stopped down a little.  Many modern lenses are trying to combat this with complex designs and finding some success, but there are always trade-offs.  One interesting one is that correcting for spherical aberrations too much can lead to less-pleasing bokeh - dang!

Larger max apertures, in theory, give a brighter image in optical viewfinders.  In most cases, this is not true however, because modern optical viewfinders use Fresnel designs that collect and focus light rays into our eye.  The trade-off of a Fresnel lens viewfinder is that brightness (and focus accuracy) benefits for very bright lenses disappear.  Some (fewer by the year) cameras allow these screens to be interchanged for screens with weaker (or no) Fresnel lens.  These focusing screens can focus brighter lenses more accurately, but give a dark image with slow lenses.

When using an electronic viewfinder or live view, a larger max aperture can allow for a cleaner image with a higher refresh rate when the light get low.  Unfortunately when the light is bright, many cameras automatically stop down their live view aperture for what I assume are heat-related issues; this makes depth-of-field larger than it will be in the captured image; it also makes focusing less precise.

I go into details on how aperture works in this article.

Focal Length

Focal length (along with sensor size) determine the field of view a lens will have on a given camera.  The shorter the focal length, the wider the field of view.


Focal length is a number measured in millimeters.  For a prime lens, it's a single number (such as 35 mm). For a zoom lens, it's a number range (such as 24-70 mm).  I cover the meaning of focal length in detail here.

The focal length range of zooms is convenient but note this is invariably trades for other desirable aspects.  Common trade-offs include distortion, max aperture, field curvature, and bokeh quality (but usually not sharpness, since it's a primary conversation point for people).

Another drawback of zooms is that trade-offs often vary by focal length.  For example, distortion might be fine at 50mm but poor at 17mm.  Or bokeh might look good at 35mm but not as nice at 24mm.  The list goes on...  These can make a zoom lens more difficult to fully master and predict, verses a prime.

Some people are under the misimpression that moving the camera closer to an object is similar to "zooming in" with a zoom lens while standing still.  They are not the same.  Moving the camera changes perspective where objects in the scene will change shape and relative position to one another.  While zooming, the perspective does not change.  Zooming instead has the same general effect as center cropping, but without the loss of pixels.

Maximum Magnification

Maximum magnification relates to how closely a lens can focus.

Only "macro" lenses can focus this closely


Maximum magnification is specified as a ratio (such as 1:1, 1:2) and represents how large of an image a lens can project in-focus.  A 1:1 ratio means that a "life sized" image can be projected on the sensor.  Such a lens is a macro lens.  Most non-macro lenses do not do nearly this well.  For example, a Canon 50mm f/1.4 has a maximum magnification of about 1:6.

If you plan on photographing flowers or other small objects, maximum magnification is an important aspect to consider.

Performance Aspects

These aspects represent imaging performance qualities of a lens that designers can control (often trading off one for another).  These are not obvious in spec sheets, although some aspects can be estimated if you read a published MTF chart.

Center Sharpness (Resolution)

Center sharpness is the measurable detail captured at the center of an image.

Under test conditions, center sharpness represents the resolution of a lens.  For human perception, a combination of resolution and local contrast collaborate as "perceived sharpness".

Resolution capability varies by aperture with wide apertures limited by aberrations and narrow apertures limited by diffraction.  Both of these limits are explored later in this article.

Center sharpness is where most people start and, unfortunately where many end when evaluating a lens.

Resolution is revealed when the image is viewed very large and can be invisible at smaller sizes or greater viewing distances.  Contrast-based sharpness can easily be added by software.  It appears as sharpness at smaller sizes and can appear as sharpening artifacts under magnification.

Resolution measurements are loaded with complications which you should be aware of when researching them:

  • Lens testing sites will often list sharpness as pure numbers but don't really give you a feel for what the difference is.  For example, if one lens can do 2500 lines per picture height and another can do 2700, under what conditions will this even be detectable?  It's generally left unexplained...
  • Changing a camera sensor changes the resolution numbers for the exact same lens:
    • It's intuitive to think of a lens-sensor system as a "weakest link" system where the worst component will limit the resolution.  This intuition is incorrect.  Resolution will increase with a higher-megapixel camera, even for even for cheap lenses.  As an example, check out this same lens tested on three camera bodies and note how higher sensor resolution makes overall resolution numbers better too.  The mathematics are described here.
    • Some sensors use a strong antialiasing filter, while others have none.  Antialiasing filters help prevent false color artifacts in well-focused fine-detail objects (like feathers and fabric), but they lower resolution as a result.  To see the trade-offs of antialiasing filters, I prepared this link.  The D810 sample in upper right image in the test has no antialiasing filter and shows higher resolution in trade for false color.
  • Transforming a RAW image into a visible image often involves a contrast-enhancing sharpening step (adding the illusion of resolution via local contrast).  If a tester is not controlling this variable, it can influence the results greatly.
  • Finally, sharpness varies per copy of the same lens, sometimes widely.  When you see a test number on a website, was it a good copy or a bad one?  For additional context, see Roger Cicala's excellent article on the subject of testing and variance.  For this reason, I'm skeptical of resolution results from single lens copies.

Quick Test: You can check lens testing sites such as DXOMark, Photozone or Lenstip, but understand the limitation described above.  Another test is to simply take pictures under good lighting and see for yourself.

Corner Resolution

Pretty much all non-damaged lenses have less measured resolution in the corners than in the center.  This is less a real-world problem than you might guess.  For example, corner sharpness rarely matters in portrait photography.  As a test, consider looking through your recent photos to determine how much it matters for you.

Again, with landscapes, corner sharpness is mostly irrelevant until f/8 (full frame).

Quick Test:

I usually do an infinity test where I focus on a distant tree (pine trees work nicely)  Some people do non-infinity testing, but this requires very precise alignment to avoid invalid and misleading results.

I first take a photo with the tip of the tree centered.  If enabled, auto focus should be turned off after taking the first shot. Shutter speed should be at least 3x the focal length (e.g. 1/150 or higher for a 50mm lens) or use a tripod.  After the shot, confirm good focus with magnified review.

The upper left image has a distant pine tree tip centered and focused.  In the shots that follow, the pine tree is placed in each corner.

To complete the test, I pan and take a photo with the tree tip in each corner.  Remember, auto focus must not be enabled or a focus change could invalidate the result.

I do this test wide open and stopped down to f/5.6 or f/8.

I evaluate results at a computer, comparing magnified views of the the center with the corners.  The center can be sharper than corners on a perfect lens copy (due to it's design).  If the corners have different sharpness relative to one another, the lens might be decentered.  If you find a difference, I recommend testing again later to prove consistency.  If you have other lenses or cameras, it might be good to try mixing them in to eliminate possible testing errors as well.  If you still have issues, read this, then make your choice about returning the lens :)

Now the brutal test of comparing each corner at 100%, not for the faint of heart! :)

Flare Resistance

A lens with poor flare resistance readily shows flaring artifacts when there is a bright light source in the frame (such as the sun).

A lens with good flare resistance can still show flare, but in more extreme cases, like a bright light in a frame corner.

Most (if not all) lenses have better flare resistance to lights in the center than the corners.  Flare resistance is an important aspect in landscape photography and, unfortunately, many landscape-oriented lenses do more poorly here than one would hope.  Last year, I rented a $1,500 landscape lens which I will never be tempted to buy - the sole reason is the disappointing flare results I saw.

Flare manifests itself in three main ways.

One is reduced contrast, either in part of or all of the frame.


Another is a series of colored discs (or other shapes) in the image.  Sometimes these can be quite pronounced.


Finally, you may see "beams" of light emanating from a bright light source, such as a the sun,


Flare is a bit tricky to test as no lens is fully immune to it.  That said, it's definitely more of an issue on certain lenses.

Flare is clearly also usable in pleasing artistic ways but it can be annoying if that's not the intent or if the flare renders unfavorably (e.g. a strong contrast reduction or giant purple discs).

A classic way to reduce flare is to use a lens hood, although this works best when the light source is out-of-frame.  Another, less satisfying, approach is to adjust composition.  Sometimes very slight adjustments can make a big difference.

Quick Test: If you have a somewhat wide angle lens, take a few pictures with the sun in different parts of the frame.  Longer focal lengths can be used too but note that the sun will be more intense and can put your equipment and eyes at greater risk.  For longer lengths, try the moon or a bright street light instead.

Focus Shift

Some lenses (especially "fast" lenses) can suffer from focus shift.  Focus shift is where the focus plane changes based on chosen aperture.  Since many cameras focus wide-open, this can create a difficult-to-resolve focus problem.

Focus shift can especially manifest itself when an afflicted lens is slightly stopped down.  In other words, if you have a f/1.4 lens with focus shift, it might focus perfectly at f/1.4, look a little off at f/2.0, then be fine again at f/4.0 (where the depth of field is large enough to hide the slight change).  Avoiding the "danger zone" aperture settings can be an effective workaround, but an annoying one.

Quick Test: A Google search for the lens model plus "focus shift" should be enough.  If you feel like experimenting, try photographing a wall or focus chart "wide open", then stopped down a slight amount.  Remember to use manual focus or the test results will be invalid.

Coma

Coma is a quality where the out-of-focus "circle of confusion discs" stop looking like circles.  It contributes to muddy-looking corners, especially if the corners are not in focus.  Many bright and wide angle lenses show coma, even "perfect" copies due to the large menu of trade-offs involved in designing these optics.  Damaged lenses with misplaced elements can show it as well.

Quick Test:  Lenstip does coma tests; see if they tested your lens.  You can alternately take a photo with the corners slightly out of focus.  Do the corners look natural or muddy?

Astigmatism

This is an effect where horizontal and vertical light rays don't focus on the same plane.  In specialized tests such as lasers entering the lens, you would be able to see how lasers coming in horizontally and vertically would focus in different places.  With general light that's coming in from all directions, the image will lose it's "crispness" and be unable to focus sharply at any setting.

Astigmatism is usually not a big issue with non-damaged lenses.  Stopping down the lens is an effective way to limit the effect if it's showing up.

Quick Test: Lenstip measures and reports on astigmatism.

Chromatic Aberration

Lenses bend light using refraction and refraction naturally creates dispersion.  In simple terms, different colors of light are refracted (bent) slightly differently by glass.  Unless you are using a simple magnifying glass, your lens has additional elements to try and balance this out but all things in lens design involve trade-offs and 100% correction may not be achieved.  Higher megapixel cameras tend to make CA's look worse because they scrutinize these details more.

Chromatic Aberrations have a two major (and several secondary) forms:
  • Lateral: In this case, different colors are projected on the sensor in slightly different places.  This creates a fringing effect.  This problem is mostly correctable in Lightroom and other tools, even in-camera.
  • Longitudal: In this case, different colors are focusing in front or behind the sensor.  This is not easily fixed as some of the light has actually lost detail (it's out of focus).  Correction software that tries to fix this generally use de-saturation tricks that may degrade the image.
  • Secondary Longitudinal:  This type relates to colors that are outside of the focus plane.  It's very common, especially in very fast and wide lenses, for color fringing to occur in high  contrast out-of-focus areas.  This will appear as "purple bokeh fringing" in front of the focus plane and "cyan bokeh fringing" behind it.
Quick Lateral CA Test: High contrast lighting brings these out.  A classic example is backlit tree branches on a sunny day.  Try a few different apertures and view at high magnification.  As mentioned above, some forms of CA can be fully fixed by software, such as Lightroom.  Note: if the problem areas are not in perfect focus, it's may not be lateral CA, but longitudinal CA.

The entire image, note there are CAs in this image but the image is not large enough to see them.

Lateral Chromatic Aberrations from the top-left corner of  the photo above.  Note the purple on the branch edges.  High contrast scenes such as this one bring it out.


The same image after a "one click" correction in Lightroom

Quick Longitudinal CA Test:

Shoot a piece of white piece of paper with black text at an angle.  Exposure should be set so that the paper is very bright (but not clipping).  Try wide open, then stopped down a couple of stops.  Compare the results.


In this really tight crops shot "wide open", you can see evidence of purple fringing in front of the focal plane and cyan fringing behind.  This is secondary longitudinal CA.

When the same lens is stopped down to f/8, the CAs are reduced.

Transmission

Some lens coatings/materials/designs reduce chromatic aberrations, flare or other issues in trade for even spectrum transmissions.  For example, they might reduce the intensity of some of the blue/magenta spectrum.  The result can be colors that look "off" and are difficult to correct.

There are "hear-and-there" reports of color issues when using third-party lenses. One argument of consideration is that the third-party lens coatings are not matched with the color filter arrays present in the camera bodies.  I'm not saying "never buy a third party lens", as I own one myself, but be conscious that color fidelity issues with these lenses are not unheard of.

Another aspect of transmission is light loss.  Due to transmission loss, a lens may be slightly darker than it's aperture specification may imply.  In video applications, this is prioritized thus cinema lenses are marketed in "T-stops".  A t-stop is a virtual f-stop where light losses are factored in.  An an example, a f/1.8 lens might be a T2 lens (allowing as much light through as a perfect f/2 lens).

Quick Test: Shooting with flash, manually set your cameras white balance to "flash".  Also set JPEG settings to "natural" or "neutral".  Now take photos of people, and colorful things (even a color chart if you have one).  Does the resulting color look correct or do you have to play with them? (Caveat: the problem may not be the lens and may be your monitor.  If the colors look bad, try a few other lenses to compare)


Distortion

An animation of an image from my Tamron 17-50mm (at 17mm) before and after distortion correction


Distortion is when lines that are supposed to be straight look "curvy".  Distortion can be partially addressed in post processing using several tools (including Photoshop, Lightroom, and Hugin).  That said, correcting heavy distortion will degrade image resolution.

Shorter lenses will have a fundamentally harder task correcting distortion than longer ones.  Zooms also have a bigger problem with distortion than primes with larger zoom ranges (e.g. 18-300) correlated to more severe problems which vary by focal length setting.

Distortion is important when photographing subject with expected straightness, such as interiors and architecture.  Photographs of nature tend to make distortion less obvious.

Quick Test: Distortion is reported by both Photozone and Lenstip.  If you want to experiment yourself. try photographing a brick wall.  Do the lines look straight?

Field Curvature

Field curvature is where the focal plane not a flat surface.  All lenses have some of this but it's too slight for relevancy on a well-corrected lens.

I can only image how many perfectly working wide angle lenses have been returned because they have field curvature and someone "tested" them for proper centering by shooting a brick wall.

Field Curvature is also more a problem with shorter focal lengths (and zooms)  Macro lenses are specifically designed to try and minimize field curvature (so they can be used for copy work).

Since landscape lenses are often short, this is where field curvature is likely to become an identifiable issue.   With these lenses, better overall focus can be achieved by focusing near the corners as opposed to the center.

Quick Test: Start with a Google search.  Test by focusing a flat brick wall and comparing center and corner sharpness (review the corner sharpness section above to account for decentering).  If field curvature is found, you may still find the lens quite usable if focused carefully.

Vignetting

Vignetting is a darkening of the image toward the corners.  It's much more common with larger sensors.  It also nearly always worse when a lens is used "wide open", rapidly improving as the lens is stopped down.

I consider vignetting to be a minor issue in the digital age, unless it's excessive.   This is especially true as the use cases where vignetting is a concern (such as landscapes) are the same ones where the lens is stopped down.  One exception (there's always exceptions) is when stitching together images, vignetting can create issues with the stitching...

The same image with an added Vignette on the bottom.  It's much easier to add these than remove them.

Quick Test: Lenstip and Photozone both measure and report on Vignetting.  You can test yourself by photographing a bright and uniform object, such as a white wall or the sky.

Physical Limitations

The limitation below (diffraction) applies to all lenses.  It's important to understand because it a limitation that affects even the most expensive equipment.

Diffraction

Diffraction is a general phenomenon that applies to all wave-like phenomenon (light included) when the waves encounter an obstruction.  No lens design can prevent diffraction artifacts.

This image shows a tiny section of a brick wall captured at different apertures.  The top row represents 100% crops of a 24 megapixel image.  The bottom row represents 100% crops of a 2.5 megapixel image.  Note how diffraction prevents high resolutions from being achieved at high f-stop numbers.
Diffraction appears as "fuzziness" in an image, especially noticeable in areas that should have the "sharpest focus".

Diffraction increases as f-sop increases and is fundamentally linked with depth of field.  Due to diffraction, you have to trade resolution potential for depth of field and this trade-off is the same for all sensor sizes.  A work-around for this limit is to angle the focus plane with a tilt-and-shift lens or view camera.

Usability Aspects

The usability aspects below are not directly related to image quality but are instead related to convenience and flexibility.

Filter Support

Some shorter lenses (popular in landscape) have bulb-shaped front elements.  This makes adding filters a serious pain.  ND and polarizing filters are powerful assets in both landscape and product photography.  I'll probably cover details in a future article.

The size of filter is also a factor with smaller sizes being much cheaper.  For example, a Hoya ND400 filter currently costs $71 in 77mm and $35 in 49mm.  If you go with higher-end filters, the price difference will be magnified ever further.

Full Time Manual Focus

Most cameras offer a "auto focus | manual focus" setting.  Lenses with full-time manual focus can be manually focused at any time, regardless of the camera's setting.

This is a convenience feature which makes the camera more pleasant to use.  With lens that gets a lot of manual focus (such as macro and landscape), it can be a big factor in usability.

Focus Throw

Focus throw indicates how many degrees the focus ring needs to be turned between infinity and full close-up.  More throw allows for more precise but slower focusing.

Electronic Focusing

Newer mounts (sony E-mount, Micro 4/3rd) often have the manual focus ring actually attached to sensors.  Electronics read these sensors and tell the autofocus motor to change focus.  I've seen good implementations of this and really terrible ones (The Sony RX100 and Fuji X100 are both terrible, the Fuji X100T improves on the X100 greatly).

I've yet to use an electronic focusing system that I liked better than a mechanical one.  In theory, it's possible by offering a long (or configurable) throw.

One thing you generally lose with electronic focusing is distance scales and hard stops.  Both losses decrease the general utility of the lens, especially short lenses and macro lenses.

Focus Markings

It's becoming more rare at this point, but some lenses still have focus markings such as scales and depth-of-field guides.  These can be quite useful in some types of photography such as landscape and street.  With time, you can "learn" the positions that work for certain types of shots, speeding up your work and reducing errors.

Focus markings work best on shorter lenses, where there is a bit more focusing tolerance and zone/distance focusing works more reliably.

Internal Focus

Most older lens designs move the outer element (or all elements) for focus.  An increasing number of modern designs move hidden inner elements instead.  Moving inner elements can offer advantages in terms of weather sealing and general protection.

Image Stabilization


Image stabilization helps steady the camera during handheld shooting.  It has upsides and downsides.  It's a bit complex to go into all of it here, but some basic thoughts are.
  • Verses a tripod, it's more flexible and convenient but the results are not as repeatable or reliable
  • It makes the lens more complex and prone to be outdated.
  • A lens with IS can ironically, blur photo in some situations.  For example, a tripod-mounted camera with IS turned on can lead to less "crisp" photos.
  • The shorter your lens, the less you need IS and the less you should want it due to the downsides.  With longer "action" lenses, IS can be a real asset.  An ideal use case for IS is when shooting wildlife handheld.

Focus Motor Type

Most older lens designs dive auto focus by a motor in the camera.  Newer designs nearly always have the motor in the lens.  There are trade-offs...

The upside of a motor in the lens is that focusing is quiet.  Focusing can also be very fast with some "hypersonic ring" designs.

The main downsides are cost and sometimes long-term reliability.

My thought on this subject is that the value of in-lens focus motors vary by application.  For wildlife and sports, they are a real asset.  For landscape, a full manual lens can be preferred as landscape compositions are (arguably) best focused manually.

Included Hood

Some may consider this minor, but I think its important to mention that some manufacturers sell their hoods as a separate (and overpriced) "accessory".  While, this may be justifiable on inexpensive lenses, I think expensive (> $500) lenses should include a hood in the box.

There are also lenses that come with built-in hoods (retractable, screw-on, etc), many of very nice build quality.  Some of these, however, are not removable which can create issues mounting filters.

Weather Sealing

Some lenses have "weather sealing".  When paired with a weather sealed camera body, shooting in a light rain should be less stressful.  Some people take this to an extreme and wash their gear under running water.  I would not recommend pushing your luck!

Beyond water intrusion, a weather sealed body/lens should do a better job keeping out dust particles.

Build Quality

I'll end with the hardest to precisely define quality of a lens.  It comes down to materials, tolerances, smoothness and the general consensus that good copies are common and "bad" ones are a rarity.

Some say that the final image is all that matters and from a certain point of view (the image viewers) they are absolutely correct.

From the photographers point of view, however, there is also the aspect of "image making" and build quality definitely has an effect on how enjoyable and reliable this process can be.  When a photographer is enjoying the process and can rely on the gear, better photos can easily result.

It's also nice to order a new lens and be confident that the first one you get will be a nice one.  Manufacturers do not all score equally here - currently (2015) Canon seems to be a slight leader in terms on consistency in their latest lenses (source), but there is no perfect solution at the prices we are willing to pay.

Summary

When buying a lens there are many factors to consider, so many that it is natural to feel overwhelmed.  For this reason, I recommend being aware of different factors, but deciding what matters to you by renting/borrowing the lens and giving it a "test drive".