Scanning Film With A Digital Camera

In summary, capturing film with a digital camera is very fast, cost-effective and delivers high quality. The negative trade-offs are that it's an advanced technique that requires more skill than other methods - but these are skills you can build, if you have the motivation!
Required Equipment
Macro Lens

In order to capture the entire film frame, you'll want a macro lens. Some properties to consider are
- In terms of sharpness, we will be using a small aperture and just about any functional macro lens will give an excellent image. In other words, if you don't have a macro lens on-hand, you can probably find a used "1970s" lens for $100 that will work great. Just make sure the magnification is enough (next point).
- In terms of magnification. The macro lens will have a reproduction ratio (such as 1:1 or 1:2) that specifies the smallest area that the lens can focus on. 1:1 means the lens can get close enough to focus an area that's the same size as the sensor is. 1:2 means that the closet focus area will be double the sensor's dimensions. This chart breaks it down for common cases:
| Camera's Sensor Size | Film Size | 1:1 Ratio OK | 1:2 Ratio OK |
|---|---|---|---|
| Full Frame (35mm) | 35mm | Yes | No |
| APS-C (DX) | 35mm | Yes | No |
| Micro 4/3 (and smaller) | 35mm | Yes | Yes |
| Micro 4/3, APC-C or Full Frame | 120 | Yes | Yes |
- You also want low field curvature for even sharpness. Macro lenses are designed for this. Non macro lenses that are adapted with reverse mounting rings, extension tubes, and close up lenses might not be.
- For focal length, I think that a prime lens between 50mm and 100mm (full frame equivalent) is a reasonable "sweet spot". The main trade-offs are
- Short focal lengths may have more field curvature. This can mean slightly softer corners than ideal (but stopping down a bit more can help).
- Longer focal length have a larger working distance. This both makes them more cumbersome (and error-prone) to setup and makes the capture process more sensitive to vibration
Digital Camera
The camera is less important than the lens. There are some considerations, however:
- In terms of sensor size, various sizes from Full Frame, APS-C, Micro 4/3rds and even 1" sensors are usable. One trade-off of note is that smaller sensors will generally produce images with more inherit contrast and less precise color. There is a good chance these limitations will not be a problem, especially for B&W negatives. If they are a problem, the issue can be remedied by taking several shots of each frame and stacking them in a tool like photoshop.
- A smooth shutter that does not cause vibrations can help avoid loss of detail. Things that can help are "electronic first curtain", "quiet shutter" and (best of all) "electronic shutter". If illuminating with flash, this become unimportant as flash will complete the exposure in 1/10,000 of a second.
- Some films (especially lower-speed B&W) have a lot of inherit dynamic range. A camera that can capture this range will be able to record all of this detail in a single capture. If not, you have the option of HDR stacking to overcome the camera's limitations. In any case, it not something to be too concerned with when starting out.
Film Holder and Camera Holder
These are described together because they need to be complimentary. The two main approaches are Horizontal mount and Vertical Mount. Lets look at them in turn.
Horizontal

For this solution, you use a device that:
- Holds the film vertically
- Links the camera and film together in a rigid way
This system has the following trade-offs
- Advantages
- Constrains all film movements except for horizontal. In other words, distance, vertical, pitch, roll, and yaw are all controlled.
- Allows easy use of flash
- Disadvantages
- Fixes the film size, usually to 35mm
- Availability is mostly limited to vintage products or from smaller companies.
- May be more difficult to correct for problems with distance, alignment, etc
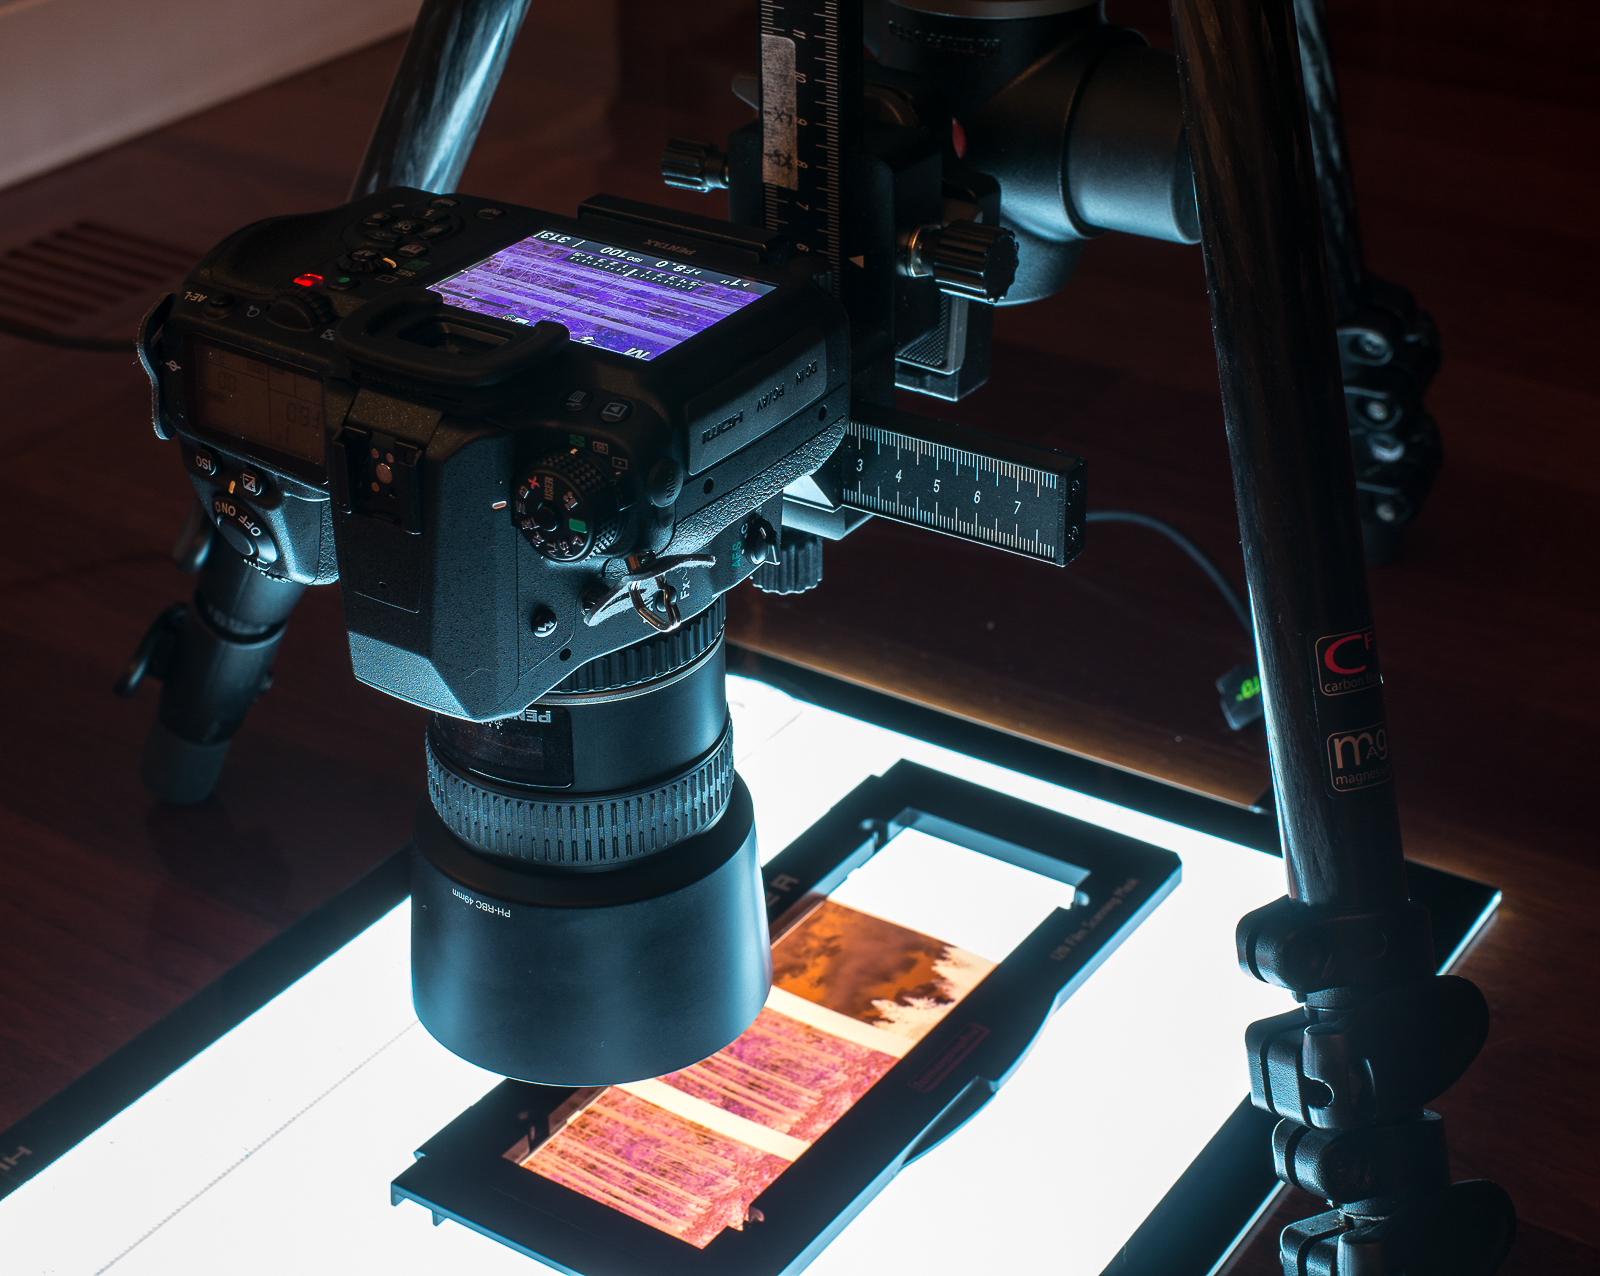
Vertical

In this system, the lens sits on a light table and is photographed from overhead. There are a variety of (vintage) stands that can be used for this. You can also use a copy stand with an LCD panel (such as this one). Finally, may be able to use your tripod with the column inverted.
The trade-offs are
- Advantages
- Very flexible to changing cameras, lenses and film sizes. Also flexible in terms of advanced techniques, such as image stitching and enhanced resolution stacking
- It's easier to imagine how the components (tripod/copy stand, light table) might be re-purposed.
- Disadvantages
- More difficult to use flash
- Additional alignment will be required: specifically the vertical and roll alignments.
In my situation, the additional flexibility of the vertical solution makes it more appealing. I like how the vertical approach makes no assumptions about my film size, lens or camera and is thus is flexible to changes here - I like changing things :)
Note that my setup uses a Helicon light pad which cost me $40. This pad works great for black and white but is not ideal for color. The problem is that the most LED lighting is not broad-spectrum (with a low CRI). It's missing deep reds, purples and some greens from it's "white" spectrum. This limitation is no problem for black and white but can create color casting issues with color (which varies by camera and film combination). For critical color work, you need to pay more attention to lighting. I'm may write a separate article on that very subject. In short, however, flash and daylight balanced incandescent work best for (artificially produced) accurate color. If you are curious about a light source, you can get a spectrometer for $8 that will reveal big problems (but will not reveal the spectral "impulses" that fluorescent bulbs have).
In terms of holding the film, I use and recommend a Pacific Image 35mm film holder which can be bought for $13. For my medium format film, I'm using a Lomography DigitalLIZA scanning mask. The DigitalLIZA has a bit more film curl in the holder than I would like but the results I'm getting are still good.


I should also note that my first 120 scans were with a holder I built from Legos. This worked fine too (although I had a bit of vignetting on the edges)

Also Consider
Scanning Mask

You might not need this, but if you are vertically scanning with a large light source, this might solve washed out images. You place it over the light source to block out light pollution. As you can see, nothing fancy is needed here. I just use a piece of cardboard with a cutout.
Wireless Remote

Once you get your camera setup perfectly, it's beneficial to keep your hands off it as much as possible to avoid any slight changes that might degrade focus. A wireless remote assists this effort.
A Soft Cloth Glove

If you touch your film with your fingers, it will likely leave a fingerprint. Not touching the film at all can make it a hassle to position film in it's holder. A cloth glove is a good solution.
80A Blue Filter (Color negative film only)

This is only useful when scanning color negative film. It basically makes it possible to capture more signal in the blue channel, which is otherwise exposed less than ideal. This allows the camera to capture more color total information in a single exposure.
Macro Rail (Tripod Use Only)
If scanning vertically using a tripod, a macro rail eases the alignment process. You can get a cheap one that gets the job done for occasional work. For more committed work, you might opt for a copy stand instead.

The Process
Alignment
This will depend on the system you are using. Here I describe how I do vertical alignment.
Using a macro rail (for convenience), I carefully lower the camera all the way to the surface.
Next, I carefully loosen my tripod's ball head and macro rail, letting the camera hood rest flat on the surface.
Next, I tighten up the ball head and pull back the macro rail just a bit. You can also do this with just the tripod column, but it will be a bit less convenient and precise.
Now check all around to make sure the gap is perfectly even, like this:
 |
| Testing for Alignment |
Finally, I continue to raise the lens until it's the correct distance to photograph the film. Again, a macro rail makes this easier but is not absolutely required.
Multiframe Calculations
Suggestion: If this is your first attempt, just capture one film frame per photo.
When you get more advanced, you can shoot larger film sizes (medium format and larger) as a grid of images, then use a panoramic stitching tool to make a very high resolution final result. I have made 100+ megapixel images this way from 6x6 medium format frames this way (and there is detail still to be seen). Typically, I'll stitch with a more pragmatic four shots for medium format, giving me about 36 MP for 6x6 and 56 MP for 6x9. Lately, I've been going even faster by using a Pentax K3 ii with pixel shift enabled, giving a very clean 24MP result with little post effort.
If there is enough interest, I'll write a separate article on the details...
Camera Settings
 |
| Exposure Settings: Manual, 3 second remote, 1/6 shutter speed, f/8, ISO 100. Your ideal exposure settings may be slightly different - especially if using flash. |
- Mode: Manual (e.g. "M"). We want the settings set a specific way and want them to stay there. Note: if you have complete faith in your camera's metering, aperture-priority is also a reasonable choice as it can work with negatives of varying densities more efficiently.
- Aperture: f/8 is a good starting point (maybe f/5.6 for micro 4/3). Opening wider with a lower f-stop number (such as f/4) may improve sharpness due to less diffraction but will also increase the negative impact of slight alignment and focus imperfections. Closing down with, say f/11, has the opposite trade-offs.
- Low ISO: Pick the lowest "non extended" base ISO. This is usually 100 or 200. Make sure Auto-ISO is off.
- Picture Mode: For positive slides, JPEG or RAW is ok. For negatives, I recommend RAW. JPEG introduces compression to the tone curve and color channels that are designed for positive images -- the opposite of what we want for negatives.
- White Balance: When shooting RAW, it's not a critical setting. I recommend fixing it anyway to something that is close to your light source (such as "flash")
- Shutter: If you camera has it, set the shutter mode to "electronic" or "quiet" to reduce vibrations
- Live View: We'll be using live view for both focusing and positioning
- Remote: I recommend using a remote to trigger the shutter. I use an IR remote and set the camera to "remote +3 seconds" to reduce vibrations. If using flash, vibrations will be a non-issue.
Load the film
When loading the film, I shoot with emulsion side up to photograph the actual silver crystals. If you shooting emulsion-down, the image will still probably be fine - I tried it both ways as an experiment
and the practical difference I saw was somewhere between subtle and non-existent.
Rough Focus
Initial focus is simply for framing and exposure. Don't bother with preciseness as you'll want to wait until you've finished locking exposure first.
Determine Exposure
A good way to do this is to take photos and check the histogram. RGB histograms are preferred because you can see each color channel separately. When looking at a histogram, the goal is for all graphs to fill as much of the graph as possible, without overloading it.
Technically, overloading it slightly to the right can be even better (as the RAW may still have latitude to spare), but this is a more advanced technique that varies between cameras - something to look into after you master the basics.
 |
| A good exposure that is holding the entire spectrum for all three channels. |
Another thing to note is the density of the frame you are scanning. If you have some frames that are "Denser" due to more film exposure, then it may be good to tweak the digital exposure for those frames.
Final Focus
After exposure is set, we can fine focus, I recommend using live view with high magnification. I also recommend manual focus.
Note that some digital cameras stop down the lens to simulate "live exposure". You do not want this on and instead want the lens to be "wide open" during focusing.
With some cameras (including many Nikons), you'll actually need to focus with the aperture wide open (e.g. f/2.8), then leave live view to stop down (to f/8).
I recommend focusing roughly 1/3 of the way from any corner. The film might be slightly curved in the holder, making the 1/3 point a reasonable middle ground.
When focusing, look for actual the silver grain crystals as your target. The sharpness of the original image (that was captured by the film camera) is irrelevant in terms of a proper scan.
Another thing I do is go a bit past the focus point each way a couple of times. This routine helps me get a "feel" for the ideal point as a "center" between going a bit far in each direction. If you not sure about your critical focus, give it a try.
Once focused, it's best if you avoid touching your camera until you've done your shots (or as little as you can practically manage)
Taking The Shots

Some tips:
- Low light is helpful to prevent glare from the film's surface. It also keeps light out of the viewfinder on DSLRs (which can degrade the image)
- Touch the camera as little as possible, a wireless remote is helpful
- If your camera has a remote + delay, you might want to use it. When shooting in live view, some cameras have to close the shutter, reopen it, and close it again. The delay can help reduce vibrations after the first close. It really depends on your camera. If you are really lucky, you'll have an all-electronic shutter to use.
- If you happen to have a Pentax K3 ii or olympus E-M5 Mark II, the pixel shift capture modes these camera have make them superb tools for extracting very-highly detailed scans in one shot.
- Consider doing each film strip 2 (or more) times. This trades additional scanning time/effort for two things:
- Insurance against a bad capture due to vibrations
- The ability to "stack" frames for higher resolution and smoother tones. This also can give better color on color scans. When scanning for high resolution, you want the film slightly shifted between shots. I do this by rotating through the strip multiple times.
- In terms of stacking I have found via experience that:
- I have not needed the "insurance", vibrations have not been a problem
- When scanning B&W, one frame is usually enough with very subtle improvements notable after stacking.
- Stacking color does seem to improve color fidelity moderately.
- For medium format scans, stitching frames gives superior results to stacking. I tried both under extensive testing.
- When shooting color, consider putting an 80A blue filter on your lens. This filter helps extract maximum signal on all three color channels (red, green, blue) which can lead to better color. Without the filter, you can't get the blue histogram near the right edge without overexposing the red and green channels.
- If you have a big light source, like the one pictured above, stray light can sometimes create problems.
- To test, try holding your hand so that it blocks the light, right outside your image. Images on the end will generally be impacted the most.
- If the image changes, then you have a flare problem.
- This is easily solved by cutting out a scanning mask and placing it over the light source (and under the film holder). If you do this mid-shooting remember to refocus!
Example Results
The result below show a side-by-side comparison of my DSLR scans (left) verses a lab scan (right).


In this case, my DSLR has both more resolution and more tonal range than the lab scan.
I also have a dedicated film scanner (PrimeFilm XE) which is rated at 10,000 dpi and lab measured at about 3,500 ppi. This means that the film scanner can do pixel-perfect 35mm scans at about 13 megapixels. I have found my 16 MP DSLR does indeed slightly beat this resolution. I've also used a 24 MP full frame D750 (and a 24 MP K3ii in pixel shift mode), and these widened the gap further.
One area where the film scanner does come ahead is in color accuracy with less effort. That's a topic all in it's own. I'll summarize here by saying that processing color scans made with a Digital camera is much trickier than B&W but that it's possible to get good results with some knowledge and effort (and a touch of luck). Here is an example 6x6 medium format color scan (Kodak Ektar 100 film):
 |
| Full Size Image is Here |
In tomorrow's article, I plan to cover B&W image processing in Lightroom, followed by color image processing the day after that. Stay tuned!
Log.e("handler", rawResult.getText()); // Prints scan results
ReplyDeleteLog.e("handler", rawResult.getBarcodeFormat().toString()); // Prints the scan format (qrcodehttps://www.scscan.cc/
The post is really awesome and entertaining. It kept my eyes glued to it. It has become my favorite pastime reading to your posts. Thanks for the information you have provided in your blog as it proved to be very helpful for me in start writing my own blogs you have provided in this blog as it proved to be very helpful to me.
ReplyDeletehttps://www.lifetimeheritagefilms.com/
Outstanding plus significant. Mainly because for any great and trying to find these details even so you can find definitely confined assets. Love created for supplying these details! transfer 8mm to digital
ReplyDelete